Monday 27 August 2012

03099: Klaus Copperthumb, Dwarf Thief completed


I had some free time this afternoon so I finished off Klaus, he came out pretty much as I wnted although the photos again don't really do him justice.  I think i'm going to have to get some daylight bulbs as even with GIMP fixing the Auto White Balance its still not quite right.


The black cloak came out just as I had hoped, successive layers of dark washes gave it depth without making it look unnatural and the linen shirt looks great in real life.  

However, the photos have also shown up the huge mold line down his right hand side that I couldn't do much with. Overall im quite pleased with how he came out but am a bit disappointed with the photos and might try and take some better ones tomorrow in better light.  


Sunday 26 August 2012

03099: Klaus Copperthumb, Dwarf Thief Work in Progress


After the craziness of the Reaper Kickstarter ($3.4m raised and over 230 minis coming my way next March!) I just couldn't bring myself to paint a non Reaper miniature next.  It just wouldn't seem right! So I decided to tackle this miniature which has been in the 'Patiently, patiently waiting' tray for rather a long time.

Basecoated
Basecoated
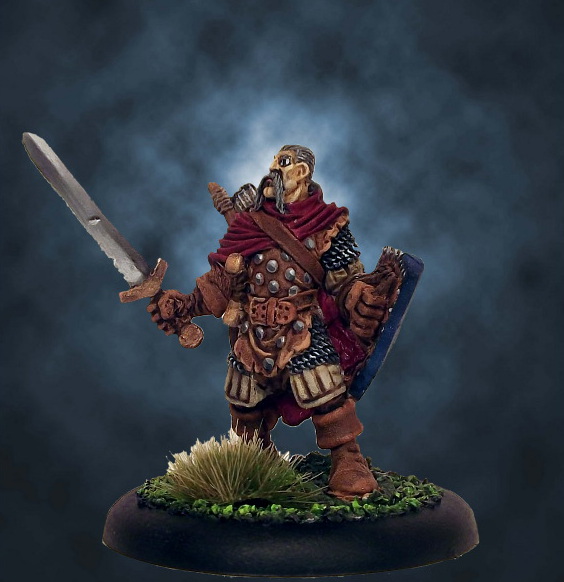
He is a deceptive figure to paint, which as he's a sneaky thief seems quite appropriate.  At first glace Werner Klocke's scult seems pretty straighforward.  Lots of cloak, quite a small face and not too much else other than boots & knee pads.  But if you look a little closer some of the detail comes out.

He has a shirt with bracers at his wrists but if you look below his belt on the right there's the edge of a waistcoat, so the sleeves of his shirt and the body aren't actually the same piece of matierial and should be painted different colours really.  I decided I liked the colour of his shirt (a natural linen) enough to overlook this and stick with it.  He also has the tops of a few pouches sticking out and they need to be picked out in a nice contrasting accept colour too. So I decided I wanted Mr Copperthumb to have a slightly sinister but still natural look.  His clothes under his cloak would be natural browns with a black cloak.

But you can't just paint a cloak black and expect it to look right.  If you look at a real piece of black matierial theres precious little black in it.  The majority of the cloak is grey with black lowlights and very light grey highlights.  I painted Klaus's cloak a mid grey, washed with Nuln Oil shade (Games Workshop) and will blend in some highlights later.

Most of the browns get a wash of Agrax Earthshade, applying the same shade wash to the different browns will help to bring them together in a similar tone, again highlighting will be done last.


I did originally plan to paint his knee pads in brown too but they look like plate to me so they're going to get the NMM treatment later (along with his axes and dagger), lets hope I can pull it off as this will only be the second model i've tried it on and a curved piece of armour is quite different from a fairly flat and straight sword blade.

1st Wash
1st Wash
So the palette i'm going for is Grey, cream and brown, i'm not 100% decided on what colour to do his beard yet, suggestions would be welcome.  I don't really want his beard to be lost in a sea of brown & grey so blonde might work.  Ginger might make it pop more but i'm not sure it'll work.

With a bit of luck i'll have time to finish him off tomorrow so stay tuned!

Friday 24 August 2012

West Wind Nazi Zombies Reviewed and Painted

After my little treat of painting Reaper's Damian Helthorne I thought I should get on with the Nazi Zombies i've been procrastinating over for the last few weeks.  Well I finished them this evening so here they are.

To be fair they weren't as big a chore to paint than I thought and i'm satisfied that they came out to a fairly good tabletop standard.  More importantly I think they'll scare the bejeezus out of my players when we play my new Weird War II game!


Click to Zoom


The miniatures have generally been well sculpted and fit in perfectly with the Artizan Designs German Infantry I painted last month.  I was rather disappointed with one of the heads though as it looks like its been squashed by someones thumb and still mass produced anyway.  This wasn't a major issue though as there were half a dozen different heads to choose from so only two or three of the pack had to use the bad one.

One of the things I did with these miniatures to bring them to life (if you'll excuse the pun) was to hand paint over the blood with gloss varnish.  This makes the blood look fresher without having to make it unrealisticly bright red.  I'm not sure if you've noticed but when you cut your finger what comes out isn't much like the ketchup coloured 'Blood Red' that Games Workshop sell, but much more like their 'Scab Red', in fact I darkened Scab Red down a little more and painted it in vertical lines down from the wounds to make it look like the blood has dribbled down.  I think it worked but i'd like your opinions, please leave a comment!

Thursday 23 August 2012

Reaper's Damian Helthorne Reloaded

As I mentioned in the last post I used a transfer for the shield design on this miniature, and it was a bad move, it brought the paint job down and just didn't work.  Thanks to some honest and supportive suggestions from the community at the Reaper Forum I plucked up the courage to return to a finished model and fix it, not something I normally do as I hate to risk ruining a model after i'm done.

So this evening I did a bit of remedial repair, took the old transfer off and hand painted a new symbol. I also fixed the eyes a bit by narrowing them and reducing the black line around them.

I toyed with the idea of a lion, a striking hawk and a castle tower but finally decided on a Horse's head as the image that would wok best in the space available.  I used the same red as the cloak with tied the shield into the rest of the character well without over doing it.

All in all i'm very glad I changed it.  What you think?

Tuesday 21 August 2012

Damian Helthorne: Reaper Miniature painted


I’m in the process of painting those West Wind Nazi Zombies I mentioned in an earlier post and I find it’s easier to paint a big unit (in this case 20 strong) if I have some other miniatures to work on as a change of pace.  This lets me take a break from the big unit without stopping painting completely which can result in a much longer break than I planned for.


So as a little treat to myself for getting all the basecoats and 1st washes done on the Zombies I decided to paint one of the Reaper miniatures I’ve had for quite a long time. 

This miniature is an exceptional sculpt by Tre Manor.  It has a very expressive face, loads of layers of different armour and clothing and so much character he was a joy to paint.  He is however a big fella so I based him on a 40mm lipped base instead of the usual 30mm ones I use.

As you can see from the photos he has a slightly surprised look, this is intentional as I want him to form part of a diorama being confronted by a dragon.  His whole pose just looks to me like he’s spreading his arms wide with a ‘why me’ look.  If I don’t find the right dragon I might just wash his eye sockets again to close the eyes up a little.


Original Non Metallic Metal painting by Francesco Granacci
For the first time I tried out a technique called NMM (Non Metallic Metals).  If you look at the sword blade, studded armour and chainmail you might notice that they don’t have the glittery look metallic paints give but are shaded with a series of greys that blend into each other.  Its time consuming compared to drybrushing Boltgun Metal over black but looks much better in my opinion.  Besides, all the great paintings I’ve seen by artists weren’t painted with glitter paint (see left!)


I also tried out using a transfer instead of free handing the shield design.  That was a mistake born of cowardice.  I was a bit worried about ruining the miniature by botching the free hand so went with the transfer (a Space Marine one I had lying around) but it doesn’t really work and brings down what has turned into a really nice paint job.  I’ll be removing it and painting a free hand design soon.


Saturday 18 August 2012

Mantic Elves, Dicarus Darksword & Warhammer Dwarf Cannon Crew

I've been pretty busy with work and family stuff the last few days so sorry for the lack of posts.  I thought you might like to see the model I have painted since the Space Marine Librarian and some better photos of some I painted for the last D&D campaign I played. 


The first set is some Mantic Elves I painted as Dark Elves.  In the campaign the heroes have to face loads of Elves and Dark Dwarfs and I just couldn't find any models that worked as D&D dark elves, Games Workshop's are terrible and I wanted a set that would look like a professional army rather than a mismatched set of individuals.  I also needed a lot of them so I speed painted 30, first step was to paint the whole model (except the face and hair) with dark grey, then I washed with watered down black.  Details were picked out in light silver.  The Officers and shields were painted Blood Red and also washed with black.  The faces I painted blue (my preferred skin tone for dark elves) and blended lighter blue as the highlight. 


Dicarus Darksword is a Reaper miniature and he is tiny, really small in fact and that presents certain challenges when your painting that you don't get quite so much with larger models.  There is very little metal to paint and he's basically all cloak.  However, Bobby Jackson the sculptor is a rather talented chap and he still managed to pack some real character into him.  We don't have a player character with a Halfling Thief at the moment so I thought i'd paint him as a Ranger instead.  I also tried using some real plants to give him a more natural setting which worked out better than I had expected.  


The last set in today's post is the Warhammer Dwarf Organ Gun & Crew.  This was bought for my son by my nephew as a birthday present and I painted it for him.  They came out a bit shiny so i'll use the Anti Shine spray from Army Painter.  I think they came out rather well, especially the leather of their clothes.


Wednesday 15 August 2012

Space Marine Librarian painted


I managed to get the Space Marine Librarian finished tonight.  If you read the previous posts you'll know this model was a test subject for Fairy Power Spray to see how well it worked for getting paint off old models.


Well the answer was really well. It was so efficient that I actually decided to repaint the old Games Workshop figure.  Originally it was painted in a dodgy Blood Angels red and I wanted to see if I could do better and opted to folllow the standard Space Marine blue colour scheme that Librarians are supposed to wear.

I spent a little bit more time blending on this one and I think it shows, I still need to put some unit markings on so i'll dig out my transfers and do that tomorrow.

I hope you enjoy the pictures! 


               Click to Zoom


What’s on the painting Table? Space Marine Librarian, Reaper Miniatures and Warhammer Wolf Riders


I often have too many miniatures to paint, not that I have any deadlines as I usually just paint for fun and not profit, but because I can’t resist them.

So here’s a run down on each of the miniatures I’ve currently got on the painting table waiting for my attention.


1. Space Marine Librarian

I used this old Games Workshop figure to test out Fairy Power Spray’s ability to strip paint (its fantastic!) and once it’s dodgy Blood Angels paint was gone I thought it would be interesting to paint it properly. I used to speed paint my Blood Angels chapter with Blood Red, wash with Black ink then pick out details with gold. Very basic but looked pretty good on the table. I am curious about how good I can get the miniature to look if I spend some longer painting it. I also think I might try auctioning it off on EBay. 

2. Games Workshop Wolf Riders. 
I painted one of the wolves last year to represent one of our D&D player’s animal companions. It came out rather well so I thought I’d finish off the rest, I also wanted to try out a technique I used to use for goblins and orcs. First you paint the skin yellow and wash with Green Ink, this gives a very vibrant skin tone with the yellow brightening the green from underneath. I’m not sure if there’s any market for Goblin Wolf Riders so I might try them on EBay but I’m happy to keep them if they don’t sell and use them for tabletop role-playing. 

3. 60041: Eando Kline, Pathfinder , 03201: Damian Helthorne and 02909: Nienna, Elf Ranger .

These Reaper miniatures have been sitting in my paint tray intimidating me with their complexity for months. I bought them because they are just exquisite but I’m a bit concerned that I won’t be able to do them justice. The level of detail on the Elf Archer and Eando Kline is very challenging so I’ll probably attempt Damian Helthorne first to build my confidence (and because he looks awesome). 

4. Artizan French Resistance. 
I have three more of these models needing painting to join the Michelle model I painted last month. They are needed for my Weird War II adventure (which I’ve finished writing) so I really ought to get on with them, but I’ve been enjoying painting more colourful miniatures recently. 

5. Secrets of the Reich Nazi Zombies. 
 I’ve got 20 of these to paint also for my Weird War II game and they have to be prepared, primed, based and painted before I can run it. I still have some time and I’m generally pretty quick when it comes to painting large units which can feel like more of a chore than concentrating on just a couple of models at a time. 

As you can see I have lots to choose from, watch this space and you’ll (hopefully) see each of these projects completed over the next few weeks.

Sunday 12 August 2012

How to prepare Miniatures for painting: Step by Step

I think its quite often overlooked what a difference good preparation can make to your final results.  Its true for examinations and its true for painting miniatures too.  A well prepared miniature improves the quality of your paint job.

Step 1: Before priming

The first thing to do is to trim off any rogue flash, this is the additional material that seeps between the two mould halves.  I find this is easiest with a craft knife, be careful because you can damage the model.  If you drag your knife blade along flash lines with the edge facing away from you and pull it towards you you will shave off the raised edge, be gentle, its easier to go back and do it again than it is to replace a chunk you've taken off my accident.

Glue any peices together or better still use Green Stuff or Milliput.  The advantage over glue is you can fill in gaps that might otherwise be noticable.  Green Stuff/Milliput can also be used to fill up gaps in the base.  With slotta bases there can often be a hole between the end of the model's base tab and the plastic base and miniatures that have a built in base will need this disguised.

Step 2: Basing
There are lots of ways to base a model, the simplest is to just to paint it green.  The next easiest is to superglue the model to its slotta base and use pva glue after painting to stick on some green flock.

As i'm preparing models for tabletop roleplay I want my bases to fit in and not look out of place both indoors and outdoors.  I glue rough sand to the base before priming and glue static grass in small patches after painting. 


It works for me but i'm sure you'll find a look and level of effort that you are happy with, don't be afraid to experiment.

Step 3: Priming

You can use brush on primer or spray primer, you have a huge range of choice when it comes to colour with Black seeming to be the most common choice.  Personally I prefer white spray primer as it gives a very clean finish and helps the colours stay vibrant.  I'm not suggesting this is the best way to do things, just the way i'm comfortable with.  Shake your can well, really well, I can't stress this enough, if you don't agitate the primer sufficiently there will be gloopy primer in the can when you spray and your finish will be poor.  Don't spray in the wind, even a light breeze can make the spray uneven and you'll get a gritty finish.

When you spray your model never begin spraying directly onto the model, spray just to the left or right then move the spray over the model ensuring an even but light coat.  Let it dry completely before you start painting.

A note on preparing models that have already been painted.

If you don't like the paint job you've done or if you've picked up some models second hand you'll want to get the old paint off.  I highly reccommend Fairy Power Spray.  Compared to the alternatives (brake fluid, Nitromoors Paint Stripper) its clean, safe, cheap and reliable.  It also works on both metal and plastic miniatures.  Just put your miniature into a bowl spray it on and leave it for 15mins (longer is better but we're all impatient) then brush with an old (and I stress the old!) toothbrush rinse with soapy water so your primer will adhere properly. Voila, clean miniature.   

I hope that's helpful.

Thursday 9 August 2012

Reaper Bones Dwarf: Review & Painting Project Part II

Click to Zoom
In my last post I did a little review on my first impressions of the new Bones range from Reaper. Specifically the Dwarf Warrior.  This evening I based and primed the model and got on with painting.  I'll be honest I wasn't really expecting what I got.

These models are really good to paint.  The level of detail is really good and once primed they take the paint just like any other model.  There have been some reports of paint not taking to the plastic without primer but I don't see any reason not to prime them so that's really not an issue.  My first impression was of a quality plastic miniature for a very low price.  That hasn't changed and I'll definitely be getting some more of the Bones range to paint.

I took a slightly more careful approach with this model as it is for a good friend and I'm hoping he'll like it.  I also used Army Painter's 6mm Swamp Tufts for the first time and i'm rather impressed.  They look much better than normal static grass.


Click to Zoom
Click to Zoom

Click to Zoom