Monday, 15 September 2014

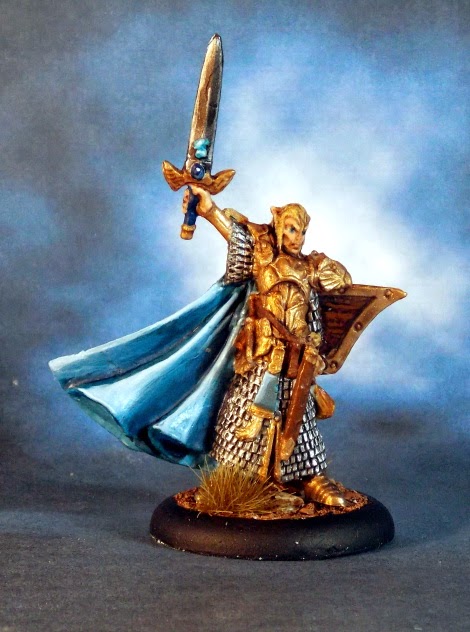
Bones Turanil, Male Elf Paladin


I took to calling this one the Pretty Boy Peacock Elf while I was painting him, the shield design is so different to most that you see it was a bit intimidating to start with, but once I began it was really easy to paint the peacock and deceptively easy to just keep adding more and more highlights.

I wanted to echo the peacock colours of vibrant blue green and gold in the rest of the model but the green was too much and made it look a bit undefined,  I like to keep my colour schemes fairly simple as I think they have more impact that way.  I free hand painted the wood grain on the inside of the shield which worked out better than expected and the gems on the sword came out nicely too but the face didn't translate too well into the Bones material and some of the detail was lost, not enough to affect the usefulness of the miniature though.

Actually, this is another character for the 5th Edition D&D game i'm going to run so the player will have to be happy with it too I suppose.  With his large shield and longsword and heavy armour he's clearly a Defensive Fighter,  so will add some much needed control to the battles i'm going to throw them into.  I have to dmit i'm really looking forward to having the whole group of seven heroes painted and together for a group shot.   


Thursday, 11 September 2014

Bones Galladon, Male Wizard


I'm going to be running a Dungeons & Dragons 5th Edition game in December and am getting some Player Characters ready in advance. This is the first, Galladon the Enchanter of Emberwood.  I didn't want him to look like Gandalf so went for a blue theme and tried out illuminating the first letter on the scroll like in ancient religious manuscripts.  I think it worked ok.

I'm going to have seven players for this game and I don't hink any of them have played 5th Edition yet so it'll be a bit of a challenge but the system is really good and i'm sure they'll enjoy the adventure I have planned for them.

Originally I intended to run a humorous game and have the players play Goblins, Orcs or even an Ettin (the Ettin was going to be played by two players who would argue over what to do each round) but when I put some thought into it I realised that the funniest encounters have never been written to be funny but became that way due to the players themselves.

With that in mind, the seven characters i'm making up will be fairly stereotypical and hopefully the players will breathe life into them.  

What do you think?  Are deliberately funny adventures more amusing than the serious ones that get derailed by crazy players?


Saturday, 5 July 2014

Bones Oxidation Beast and Bones Battleguard Golem

Deadly Enemies

I really enjoyed painting these two, they were painted as a pair but I wanted to base them separately so I could use them for other purposes than just as display peices.
 
 
The Battleguard Golem was a bit of a challenge, I didn't like the model that much, the proportions seem a bit off and it never really inspired me to paint it.  But when I was looking for a model with a lot of metal to be the Oxidation Beast's victim this one stood out, not only is his armour at risk of being consumed by the monster, he is his armour so his very existence is in jeapody.

I began with a base coat of Boltgun Metal with a wash of Nuln Oil to bring out the details, on the right side he then got successive layers of Runefang Silver, washes and finally a layer of Gloss Varnish over the bright silver to make it really shine (a trick I picked up from Hendybadger, thanks mate!) this contrasts well with the very matte finish you get from the Ryza Rust and Typhus Corrosion.  The Sword was painted with the same colours but different washes and with the addition of a Burnished Gold hilt and an ivory pommel.  I wanted the sword to look quite different to the armour and I think it worked ok.  The gem on the blade, they eyes and the gem on the back of the armour started with Temple Guard Blue, a little Nihilakh Oxide (Technical Paint) for the glow and a point of pure white at the top.


I wanted it to look like the Oxidation Beast's attack was creeping up his body from his left foot and hand up through his body, so over the base coat I layered Typhus Corrosion and Ryza Rust with a little Runefang Silver on the edges, i'm really happy with the effect, these Technical paints are very very effective.


The Oxidation Beast (or for us old D&D players, The Rust Monster) started to go wrong but i'm happy with how it turned out in the end.  
I took my inspiration from real world Millipedes and started with a sandy beige colour with layers of Agrax Earthshade, Army Painter Strong Tone Ink and Reikland Fleshshade and
it was starting to look like a Facehugger from the film Alien, it just didn't look right.  In the end I layered Vallejo Parasite Brown over the central body sections and forelimb armour plates and highlighted the edges of the side armour with a pale mix of white and Bubonic Brown.  At first I thought this was too light a shade but it's grown on me and now I think it was the right choice.   


Mobile Painting Desk

Like a lot of painters I don't have the luxury of a permanent studio area to paint in, to get around this I use a mobile paint station.  This has evolved and changed quite a bit since I got back into painting and I thought an update would be a good idea.

You might notice the doorbell on the bottom right. This is to summon my 15yr old son when I want him to come down from his room, usually to make me a cup of tea.  I know, i'm a bad parent, but he doesn't have any other chores.


The desk itself has a raised shelf across the back, a large painting area, a pull out keyboard shelf which is handy for keeping tools on and plenty of space underneath for storage boxes (mainly filled with half painted minis).  You can pick these up on eBay for under £10.

I'll run over how I use this space and what some of the additions are.  Across the top shelf I have two three-teired nail varnish display shelves (£8 each from ebay, let me know if you want the details) which hold 33 Vallejo 17ml bottles or a combination of Citadel bottles.  These even fit the now discontinued but excellent six sided bottles they used to make.  In front of the stands I have another row of bottles and the Technical paints and washes I use a lot.  Finally attached on the left is a magnifying desk lamp with a daylight bulb, I use this mostly for the light but the lens comes in handy sometimes.

Covering the painting area I have a large non slip self healing cutting mat, these are great and really cheap at about £5.  From left to right on this shelf I have a small bench vice I picked up from a junk shop, this is fantastic for modelling and I recommend picking one up if you see one (one tip, get one with the square flat anvil area behind the vice, its really useful).  I also have a desk clamp with a magnifying glass which come sin handy for holding models together while glue dries.  


On the right I have a water jar and a brush holder, this is full of mostly old brushes which get used to metallics, drybrushing, pva glue.  I have a second pot I keep my Winsor & Newton Series 7 brushes in (bought for me by a good and very generous friend as a thank you for painting a wedding cake topper for him) along with a precision craft knife and my pin vise drill.  I also have a couple of Games Workshop's mixing palettes which I use all the time, normally i'm not a great fan of GW's accessories but these are fantastic because they are slightly slippery and can be washed clean really easily. Some of the palettes i've used in the past are a real paint to clean and built up old paint holds dust which can make the mix you use over the top gritty.

The pull out shelf is generally used as more space for tools like pliers and craft knives and I use it when i'm putting together larger models and need more room.  Under this shelf i've got four sets of storage boxes with pull out draws, these hold basing materials, spare paint and far more half finished miniatures than i'm comfortable to admit.

The real advantage to this desk for me is that I can use my computer while I paint, watch TV and be sociable with my wife while she watches TV but I can wheel it into another room when i'm not going to be painting for a while or need the family room tidy for a party.  The disadvantage is I can't really use an airbrush as I think it would make too much mess and noise and i'd really like to try one out.  


Wednesday, 2 July 2014

Reaper Bones Orc Chieftan and Scibor Mad Dayn


This week I decided to get my act together and do some painting, to kickstart it I treated myself to a resin miniature from Scibor and while I was working on that I finished off the Reaper Orc Chieftan that had been stalled for ages.
  

I'm pretty sure this is a problem common to many painters, a long line of miniatures that have been started and not finished, in some cases just primed and based and in others close to finished.  I have far too many of them to be comfortable with and have decided to make a concerted effort to get them finished.  We'll see how well that works!

Ok first the Scibor Dwarf.  This is the first Scibor miniature i've painted and one of the few resins  i've ever bought.  The sculpting is very clean although not as imaginative as I had thought, a few more details like a belt knife or some more detailed boots would have been nice but the pose is fun and I can't complain about the quality.

I tried some free hand tartan on the trousers which sort of worked but they came out a lot darker than I think they should have.  The problem was of my own making, I made the shirt too dark and lighter trousers looked weird so I had to darken them.  I also tried out the Citadel technical paints 'Ryza Rust' which I love.  The trick is to use a stiff stipple or old dry brush, wipe most of the paint off onto a tissue then dab the area that should be rusted until a deep enough layer has formed.  The edge is then picked out with Runefang Silver to make it look like that's the only part that gets any action.  

The Reaper Bones Orc Chief had been sitting staring at me from among his half painted friends for quite a long time.  Long enough to have hatched numerous evil plans for my demise from the look on his face!  However, those Technical paints came to the rescue again and motivated me to use the 'Typhus Corrosion' 'Ryza Rust' and 'Blood for the Blood God' versions to make him look really grungy.  The Typhus goes on first which makes the metal look really grimy like the inside of an oily engine, over this patches of rust are allied then  the same Runefang treatment to sharpen the edges.  On the axe the Blood for the Blood God is then applied, its pretty gloopy but not as good as the other technical paints I don't think.
  

Sunday, 4 May 2014

Egyptian Bones Stone Golem & Legionary 2014 Show


Its a three day weekend here in the UK so I took the chance to visit a Gaming Show in Exeter called Legionary 2014 run by the Exmouth ImperialWargames Club and to finish my latest Bones miniature.

There were a around half a dozen different Egyptian style miniatures in the Bones Kickstarter I backed and i've been looking forward to painting them for a while now.

I thought i'd start with the Stone Golem, its a really iconic miniature and will no doubt see some action in plenty of dungeons.  It also fills a gap in my collection for a Golem so even if we don't run a game in a middle eastern setting it'll fit in for most generic settings too.  

I wanted a sandy style finish so mixed a base coat of Citadel Bubonic Brown with a touch of pure white, washed with Reikland Fleshshade and Nuln Oil and highlighted with a 50/50 Bubonic Brown & Pure White mix.

I considered painting the skirt as white linen but it has cracks which suggests its really part of the sculpture, I was going to paint the crown and bracers in white and dark red like the double crown of Egypt but decided against it.  In the end I just painted the eyes a glowing Scorpion Green which I think adds an air of drama as the only other colour on the model.

I hope you like it, i'd love to hear your opinions on whether I should have painted the crown, skirt & bracers in other colours though so please leave a comment.

More Golem photos at the bottom but first....


The 2014 Legionary show at Exeter was a lot of fun, I took my youngest son along and we toured the various trade stalls where everything from Copplestone Castings, Artizan, Games Workshop and Bolt Action were on sale along with Games systems, modelling and painting supplies and weird stuff beyond counting.

There were around a dozen large tables with wargames ongoing from Ancient to modern periods, and the quality of the painting was excellent and we were made to feel very welcome by everyone we spoke to.

None more so that the boys from the 'Tales of a Tabletop Skirmisher' group who let my son play a game of Pulp City.  He really enjoyed the game and I enjoyed watching, the chap who showed us the game (I think his name was Ross) was enthusiastic and explained the game well and told us quite a bit about how the game is developing and their role in being playtesters for it.

The core rules only cost £20 from their website but is currently out of stock, hopefully this will change soon as i'm very keen to get it and start building some scenery and painting some of their excellent miniatures.

Thanks to Hendy Badger and (possibly) Ross for showing us the game and infecting us with their enthusiasm!


Monday, 21 April 2014

Back to the Bones


Its been quite a while since I did any painting and sometimes I just end up taking a longer break than I intended.  This time it was the Orcs fault.  I have six of them sitting on my painting desk glaring at me with their unpainted accusing eyes and I just haven't had the enthusiasm to tackle them.


Anyway, I got the urge again today and decided to switch to a different miniature to get myself started again, I chose another Bones product from Reaper mainly because they don't need priming.

Anval Thricedammned is the evil fella I picked, he's got good muscles to work on and plenty of mental armour to try our Games Workshop's new Typhus Corrosion Technical paint on.  Well the muscles went ok, I chose a redder base than usual because I wanted him to look unhealthy without looking pale and 'undeady'
(thats a new word, you can all use it but i'm keeping the copyright). And the armour was good, although I did have to change gears a bit as there was going to be just too much iron with too little differentiation between them so I added in a little gold.

The Technical paint works well, it drys to a matt finish and is fairly gritty, sort of like the crud you get inside an engine where oil mixes with grit and dust.  I'll have to find a tank to paint to really try
it out.  But in this case it worked to age the armour and stop it looking too heroic.

Overall i'm pretty pleased with Anval and i'm sure he'll see action on our tabletop soon.